|
  

Fuel Injection Servo
 | 2011.02.01: (0.0)
My fuel injection servo is a Precision Airmotive Silver Hawk EX
(non-certified RSA-5AD1 clone) with the "alternate rotation
mixture" option (for details on my selection process, see here). In Precision's nomenclature, the entire FI system is KIT
# EX360-3, and the servo assembly is p/n 3015010-1 (model EX-5AV1 with
alternate rotation mixture).
With the above details determined by the model ordered, there are
still a few field-configurable features that can be adjusted to
facilitate the specific installation. Among these are:
- throttle lever style
- throttle lever clocking
- mixture lever style
- mixture lever clocking
- fuel inlet fitting style
- fuel inlet fitting side: left or right (i.e. mixture side or
throttle side)
- fuel outlet fitting style
- fuel outlet fitting side: front or back
The servo as delivered to me with the engine from Aero Sport was
configured in a way that I presume fit best with Aero Sport's engine
test cell. Now the task at hand is to reconfigure it to fit my
installation. Now, while ultimately the FI servo will be mounted
to the engine, which will be mounted to the airframe, I'm doing the
initial fitting on the bench, with only the FI servo, control cables,
and control cable anchor bracket. The main considerations at
this level are as follows:
1. Interference with the airbox
Van's filtered air box will be mounted to the bottom flange of the FI
servo. The issue is that the mixture lever, which typically is
clocked down on these servos, protrudes below the plane of the flange
and therefore interferes with the airbox. To prevent this
intereference, in my installation the mixture lever will be clocked up
rather than the typical down. (Note that this, consequently, is
why I need the alternate rotation mixture option, to preserve the
standard control direction of forward-rich / aft-lean).
2. Control cable geometry
There are some general requirements to rigging the control cable
geometry, including the following: The control cables be more-or-less
in the plane of rotation of the control levers, and anchored at a
distance from the control levers that allows the cables the full range
of control motion. The geometry must never allow the cable to
reach its own travel limits, but rather to ensure that the forward and
aft control stops of the device (in this case of the throttle and
mixture control stops on the servo) are what limits the cable
travel. The geometry should also make the travel as linear as
possible for smooth bind-free operation, and of course prevent the
possibility of anything remotely close to an over-center condition,
whic is generally accomplished by clocking the control lever such that
it is more-or-less perpendicular to the control cable at mid-travel.
Satisfying the above conditions involves the control cables
themselves, a bracket for anchoring the control cables, and the choice
of style and clocking of the control levers.
2.1 Control cables
The control cables themselves (sold by Van's, manufactured by ACS)
have a maximum travel range of about 2.5 inches. There is also
some range of adjustment in the absolute distance from the moving
cable end to the non-moving anchor point, determined by the position
of the jam nuts on the threaded anchor point, and by the position of
the rod end bearing on the threaded cable end. And, these cables
also have a neat feature where the cable end is on a swivel joint at
the anchor point that allows for a few degrees of angular misalignment
without binding or causing excessive friction.
2.2 Control levers
The control levers themselves are available from Precision in five
different geometries, the two variables being the radius and
offset. For the throttle, I found that the default lever
provided (2.00 inch radius, 0.938 inch offset, p/n 2521196) was indeed
the best choice. With its range of rotation, it produced a
maximum cable travel of about 2.1 inches, which fits nicely within the
2.5 inch max travel of the cable. For the mixture, I found that
the 2 inch radius lever that I received with the servo produced a
cable travel longer than 2.5 inch, due to the wider range of rotation
of the mixture control. Exceeding the max travel of the control
cable was a no go, so I needed a smaller radius lever. A lever
with radius 1.625 inch available from Precision was just the ticket,
producing a cable travel of, again, about 2.1 inches.
Perfect! In the case of the mixture lever, I also chose to go
with a zero offset instead of the default 0.938 inch offset.
This is to keep the installation as tight as possible and prevent a
possible interference that some have reported between the standard
"Z bend" offset lever and the cowling. Alan Jesmer at
Precision was kind enough to trade me for the mixture lever I needed.
So in summary, the levers I went with are:
Throttle lever: 2.00 inch radius, 0.938 inch offset, p/n 2521196
Mixture lever: 1.625 inch radius, zero offset, p/n 2522004
The clocking of the levers is also user adjustable in small increments
by loosening a nut, re-clocking the lever, and re-tightening the
nut. For reasons unknown to me, the nuts and safetying
mechanisms differ between the throttle and mixture. The throttle
takes a castle nut and cotter pin, and the nut torque is speced at
90-130 in-lb. The mixture takes an elastic lock nut and is
speced at 90-100 in-lb.
2.3 Control cable bracket
A bracket is required to anchor the non-moving sleeve of the throttle
and mixture control cables in the appropriate geometry relative to
then servo.
Now, it would be desirable to be able to use Van's standard control
cable bracket (VA-182-PC). It gets sandwiched between the engine
and the servo (and a pair of gaskets), but was originally designed for
a Marvel carburator, not a FI servo. As it turns out though,
this bracket is a good starting point for the FI as well. The
geometry for the throttle control works out perfectly as is. And
the geometry for the mixture control requires only a minor tweak to
the bracket. The original bend in the bracket has to be unbent
just slightly to about 38°, and an additional 38° bend must be made
parallel to and about 1.7 inches away from the original bend (just
above the control cable anchor point, allowing sufficient clearance
for the cable anchor nuts and washers). With this minor tweak,
the geometry works out perfectly for the FI mixture control as I
rigged it.
3. Fuel inlet fitting
As a consequence of clocking the mixture lever up rather than down,
the fuel inlet fitting cannot be on the left side, as there will be an
interference between the mixture lever and the fuel inlet hose.
So in my installation, the fuel inlet fitting will be on the right
side (i.e. throttle side).
Swapping sides is a simple task. Remove the inlet fitting, the
fuel inlet screen, and the plug from the opposite side (the inlet
fitting and plug are standard #6 9/16x18 straight thread and O-ring
seal). Then simply install them in the reverse
orientation. Torque on the fitting and plug is speced at 65-70
in-lb.
The fitting itself that I received with the servo is a straight type,
although apparently others are available. The straight type will
probably work ok, but I may need to revisit this when I determine the
inlet hose routing.
4. Fuel outlet fitting
To be determined. Aero Sport set it up with the fitting on the
back side, and the fitting itself is a 90° elbow, clocked to the
right (throttle side). I haven't worked out the hose routing yet
between the servo and the flow divider, so this will have to wait.
|
 | 2011.02.04: (0.0)
Some photos and more details to go along with the above
text. Note that, being just a test fit, some of the safety
hardware (lock washers, jam nuts...) and rubber dust caps are absent
from the control cables. In the final installation, they will
all be there.
Fuel inlet fitting

Above: removing the inlet fitting from the left side (mixture
side). Note the inlet side of the fuel inlet screen, now
exposed, poking out from inside the servo assembly. A keen
observer might also note that in this photo the mixture lever is a
"Z bend" offset type, and is clocked downwards. This
photo was taken before I swapped it for a straight lever and clocked
it up.

Above: Fuel inlet components removed and laid out on the bench.
From right to left:
1. Fuel inlet fitting
2. Fuel inlet screen
3. Plug for side opposite of the fuel inlet fitting
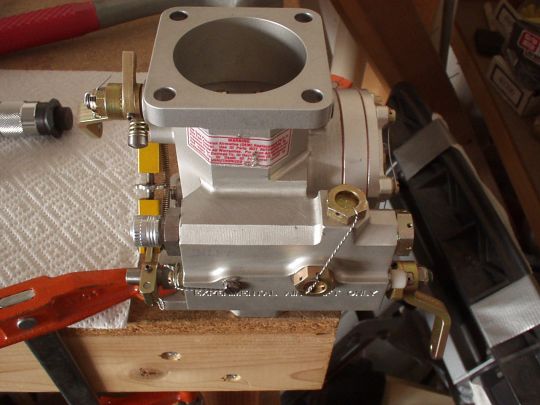
Above: Reinstalled fuel inlet components with the inlet fitting on the
throttle side (starboard side of the aircraft, which in this view is
the left side of this photo). Note also that the fuel inlet
screen (not visible while installed) has been installed in the
opposite orientation from before. It should always be installed
with the inlet end on the side of the inlet fitting and the spring end
on the side of the plug.
Throttle control
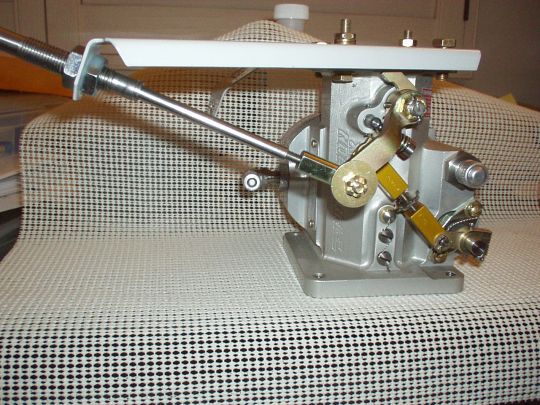
Above: Throttle closed, i.e. idle position.

Above: Throttle about half-way open.
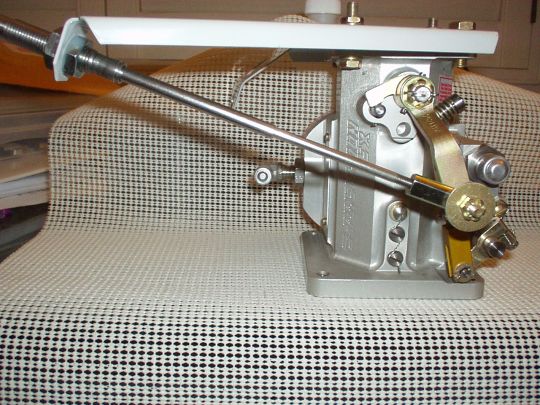
Above: Throttle fully open (i.e. "WOT").
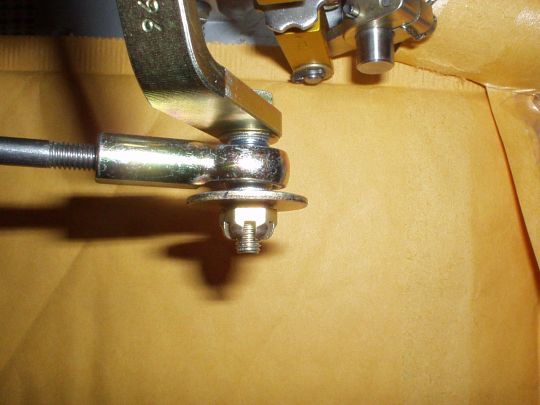
Above: Top view showing the hardware stackup for throttle lever to
cable end.:
1. AN3-10 bolt oriented with head inboard
2. Throttle lever (2.00" radius, 0.938" offset, Precision
p/n 2521196)
3. AN960-10L thin washer
4. Narrow diameter washer (OD 0.311", thickness 0.057",
Van's p/n 5702-75-60)
5. MW-3M rod end bearing (note that there would be a jam nut too, not
shown)
6. Narrow diameter washer (OD 0.311", thickness 0.057",
Van's p/n 5702-75-60)
7. AN970-10 wide diameter washer
8. AN310-3 castle nut and AN380-2-2 cotter pin (not shown)
Mixture control
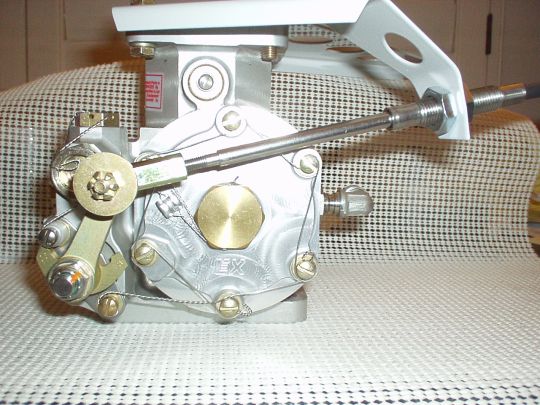
Above: Mixture in idle-cutoff position.
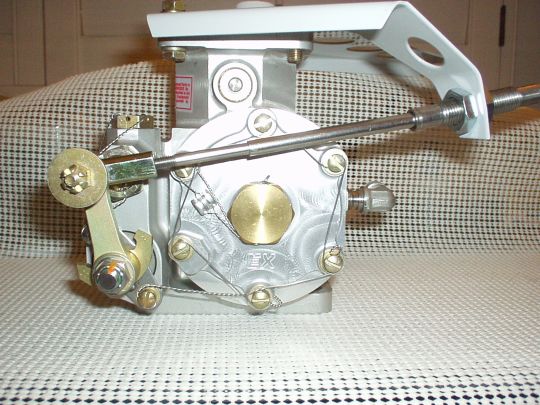
Above: Mixture at about half-way position.
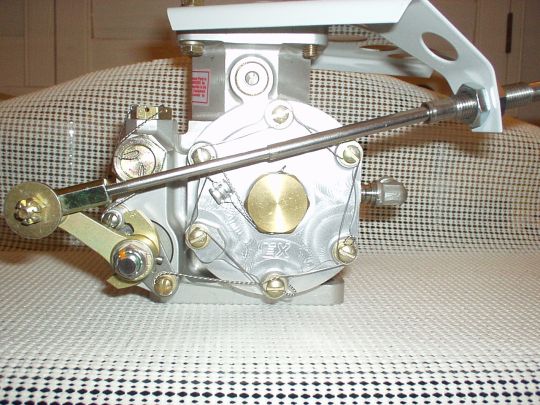
Above: Mixture at full rich position.

Above: Top view showing the hardware stackup for mixture lever to
cable end.:
1. AN3-10 bolt oriented with head inboard
2. Mixture lever (1.625" radius, zero offset, Precision p/n 2522004)
3. AN960-10L thin washer
4. Narrow diameter washer (OD 0.311", thickness 0.057",
Van's p/n 5702-75-60)
5. MW-3M rod end bearing (note that there would be a jam nut too, not
shown))
6. Narrow diameter washer (OD 0.311", thickness 0.057",
Van's p/n 5702-75-60)
7. AN970-10 wide diameter washer
8. AN310-3 castle nut and AN380-2-2 cotter pin (not shown)
|

  
|
|